Every writer knows the pain of staring for hours at a blank page and producing nothing.
But you don’t have to start your draft on an empty Google Doc. It’s much easier if you begin with an outline.
Creating a blog post outline will help you:
- Overcome the dreaded “writer’s block.”
- Organize your thoughts before you put pen to paper.
- Ensure you’re not missing any important points.
- Order your blog post in a logical, easy-to-read structure.
- Get you and your editor, client, or manager (if you’re working with one) on the same page.
In this post, you’ll learn how to write a blog post outline. Let’s get started.
2. Select your content format
Will your article be a listicle or a how-to? Or perhaps it’s an opinion piece, a review, or you’re simply covering the latest news.
Whatever it is, you’ll have to decide on a format.
Sometimes, the format is screaming at you in plain sight. For example, if you’re covering the topic “how to make kefir at home,” then it’s probably going to be a how-to guide. Or if you’re covering the topic “blogging tips,” then it’s probably going to be a list of tips.
But sometimes, it’s not so straightforward. Is the topic “best productivity app” a list of productivity apps, a review of a particular app, or an opinion article about the “best app”?
The truth is it can be any of the above. You’re free to choose, and there’s no one right answer. But if you really cannot decide, then a good way to “settle” the debate is to simply look at what’s ranking for that topic on Google.
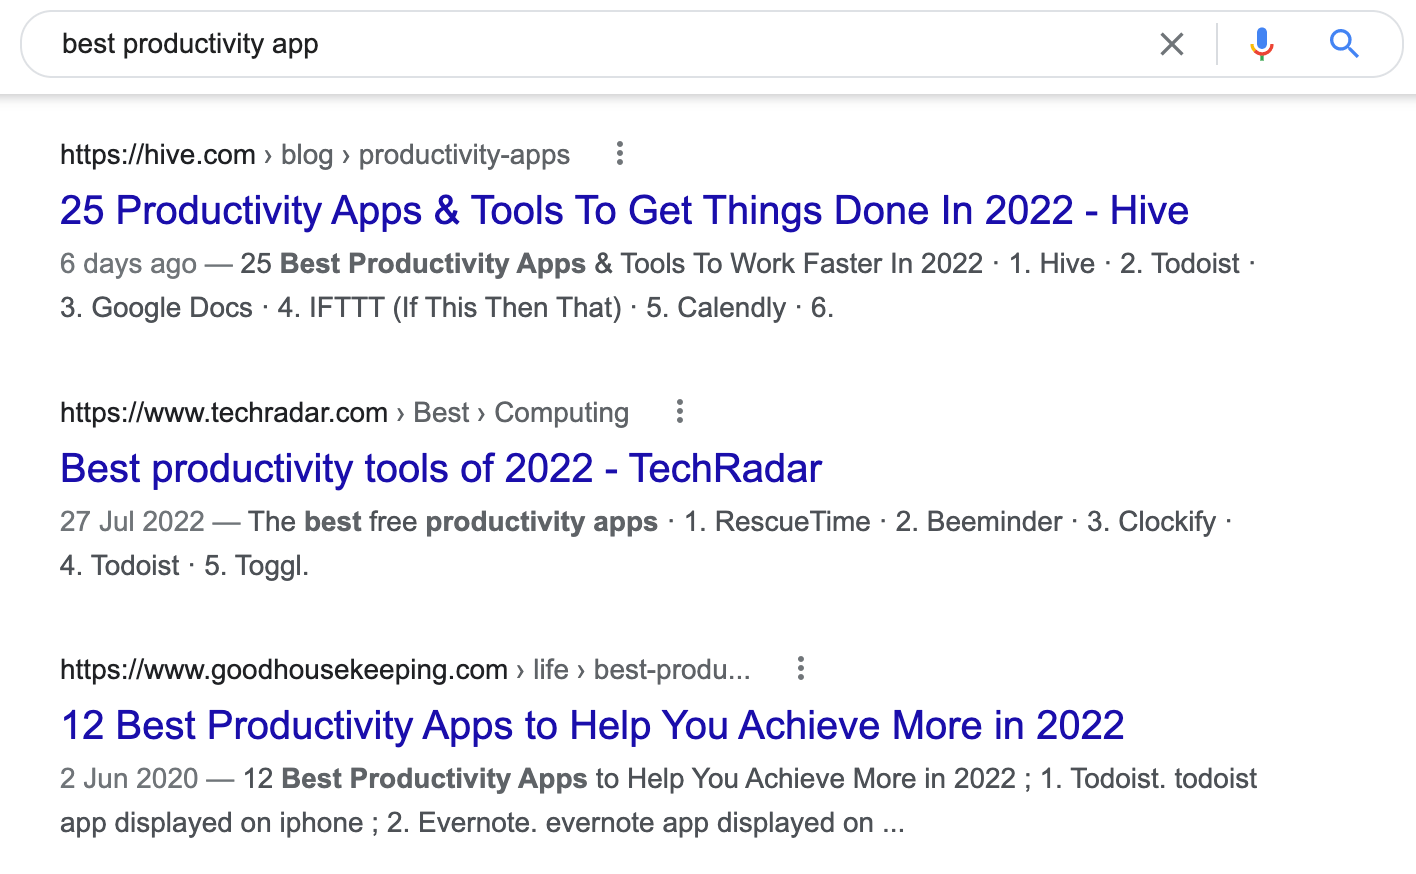
So searchers for “best productivity app” are actually looking for “best productivity apps.” Google knows that and ranks only listicles for that topic. If you’re stuck, creating a listicle could be a good way forward.
Recommended reading: 10 Types of Blog Posts & How to Use Them Effectively
Mr. Bean falls to the ground. A spotlight shines on him. The rest of the street has faded into the shadows, and your attention focuses on Rowan Atkinson’s character.
The topic you’re covering is the entire street, and the angle you choose is the spotlight. It focuses on one aspect, to the exclusion of others. If you’re writing about “how to make ramen at home,” are you teaching your readers how to:
- Make ramen fast?
- Make restaurant-quality ramen?
- Make tonkotsu ramen?
- Make vegan ramen?
- Make Sapporo-style ramen?
- Make Korean-style ramen (also known as ramyeon)?
You can’t possibly cover everything. So you need to choose. In fact, it’s the angle that makes your article unique and interesting to readers, thereby making it stand out.
Use these questions to spark ideas for your own novel angle:
- Do you have personal experience or expertise? For example, if you’ve managed successfully to infuse Singaporean flavors into ramen, then you can share your unique recipe with others.
- Can you interview experts? For example, you can interview a famous ramen chef on how newbies can potentially make restaurant-quality ramen at home.
- Can you crowdsource opinions and ideas? For example, you can poll members in r/ramen for their best at-home ramen recipes.
- Can you provide data or back your article with science? For example, you can potentially show readers how to create the “perfect” ramen by looking at the sensory relationship between different acids and flavors.
- Can you be contrarian? Don’t be contrarian for the sake of it. But if you have an opinion that’s the opposite of everyone else’s—for example, how ramen is actually ultra healthy—and you can back it up with evidence, it can be an attention-grabbing angle.
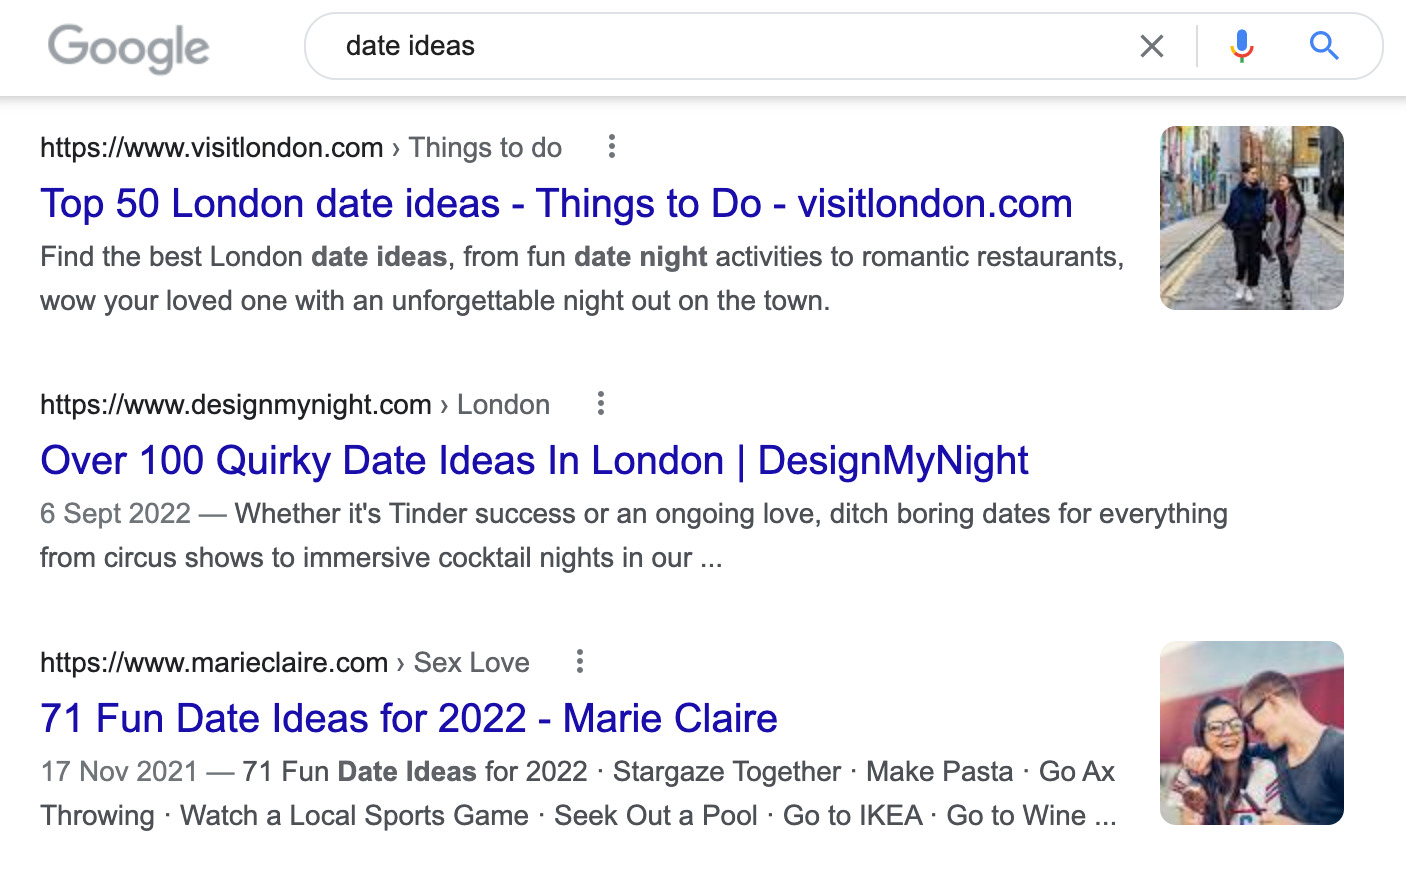
Recommendation
- Location-specific (“London”)
- Quirky
- Fun
- Cool
- Creative
And more.
Have you ever noticed that most blog posts are structured quite similarly?
In fact, most blog posts you read are variations of the same templates. So you don’t have to reinvent the wheel on this front. Choose a template that fits your format and get started.
For example, we use this template for almost all our step-by-step guides:
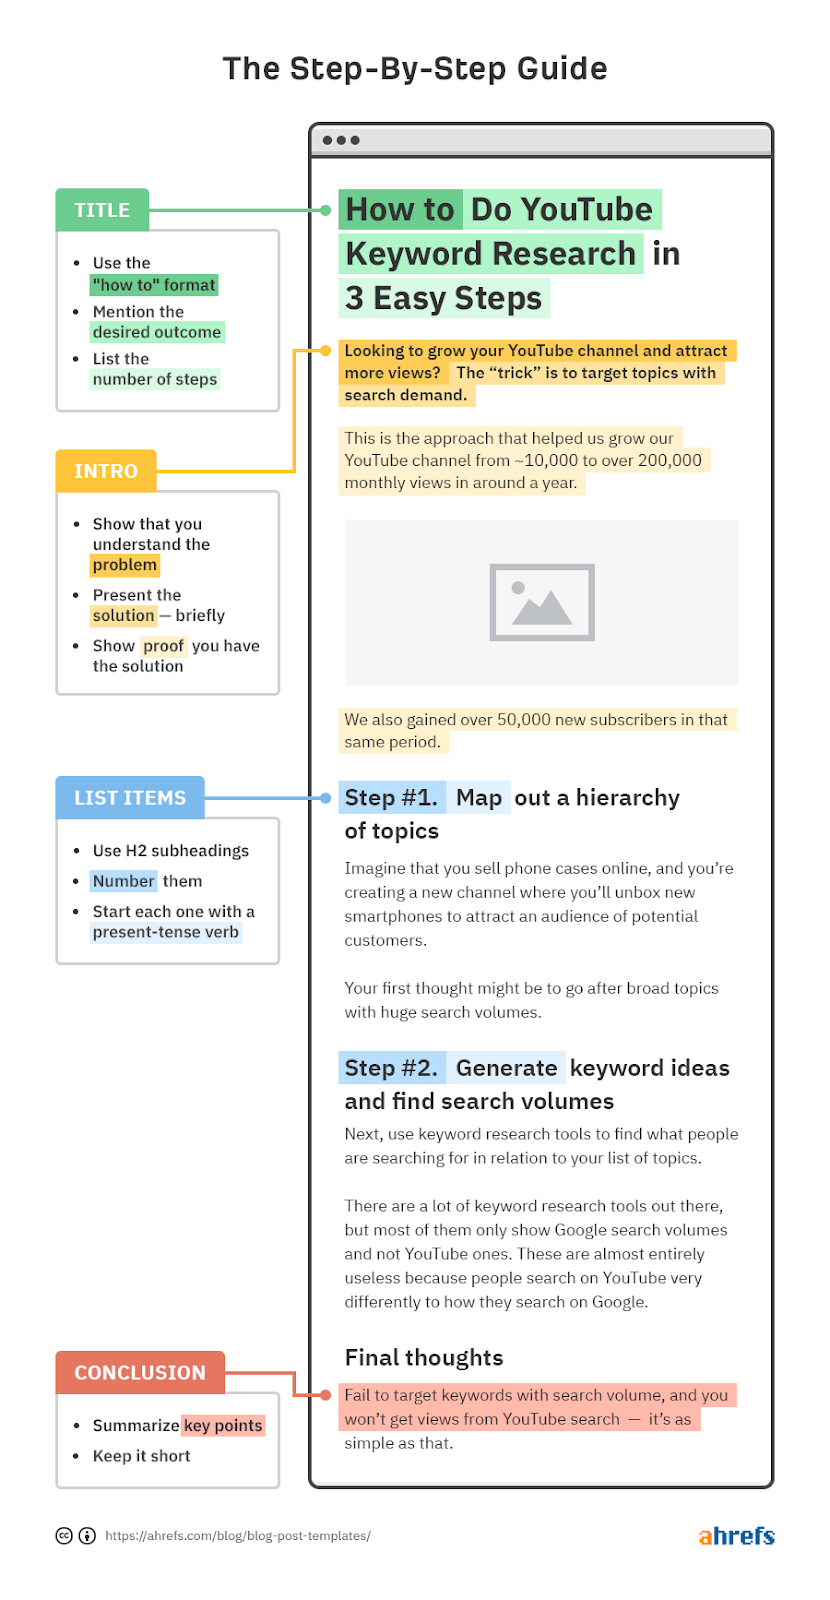
Looking for more templates? Check out the blog post below.
Recommended reading: 4 Simple Blog Post Templates (And When to Use Them)
Your template has provided you with the skeleton. Now, you need to figure out what you need to fill in, especially your subheadings (the H2s, H3s, H4s, etc.).
Here are some ideas on how to find them:
A. Use your expertise and experience
The first step is always to look inward. If you know there is a proper way to do something, then use that as a basis for your outline.
B. Run a content gap analysis
We can use the current top-ranking pages for your topic as inspiration too. After all, if most of these pages are covering certain subtopics, then it’s likely they’re important to your readers.
Sidenote.
Make sure you’re only looking at pages with a similar angle as yours.
Here’s how to find these subtopics:
- Paste a few top-ranking URLs for your main topic into Ahrefs’ Content Gap tool
- Leave the bottom section blank
- Hit Show keywords
- Set the Intersection filter to 3 and 4 targets
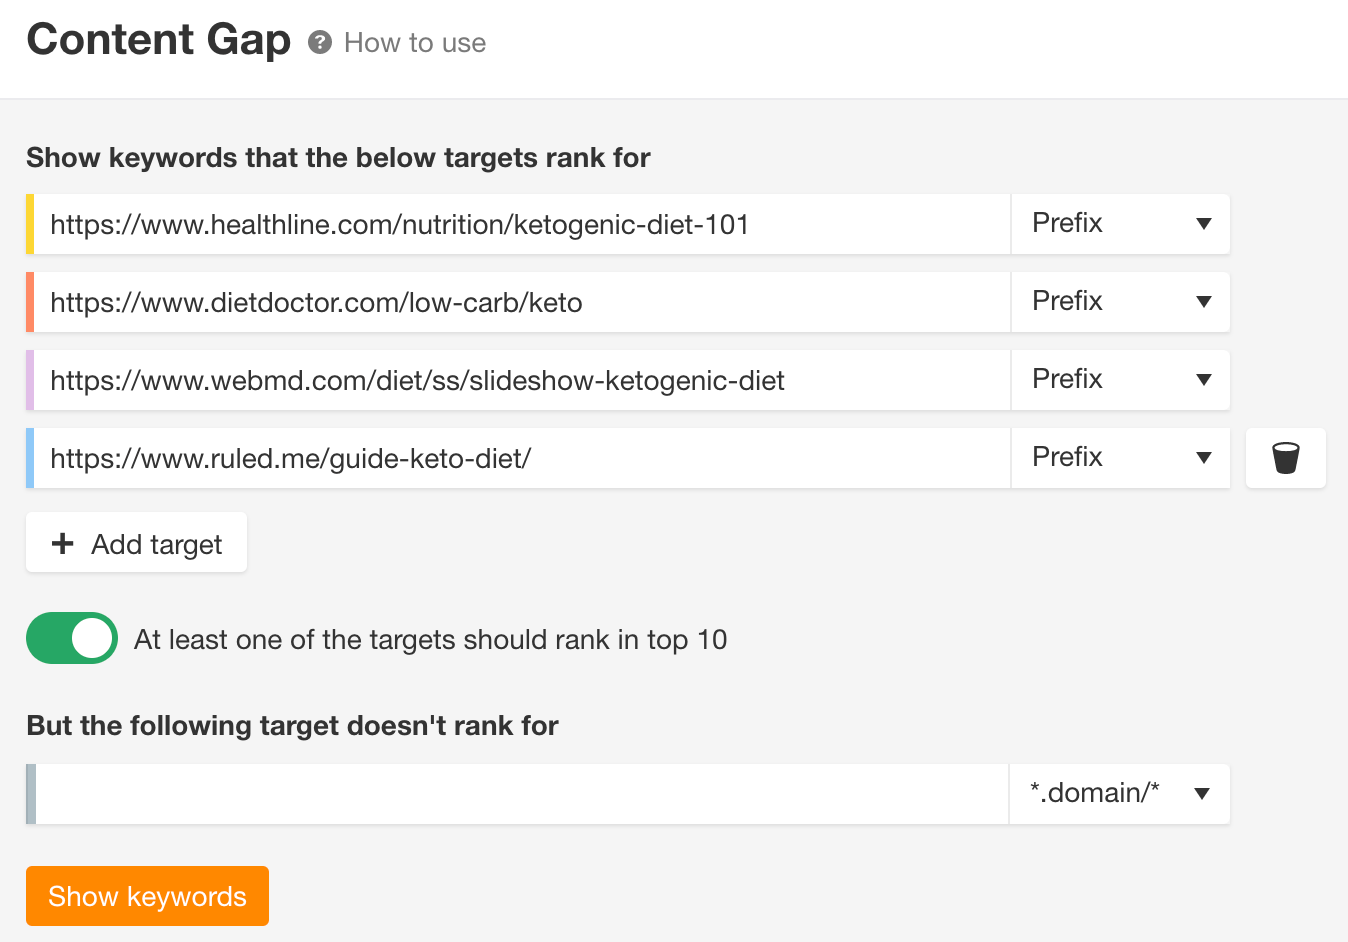
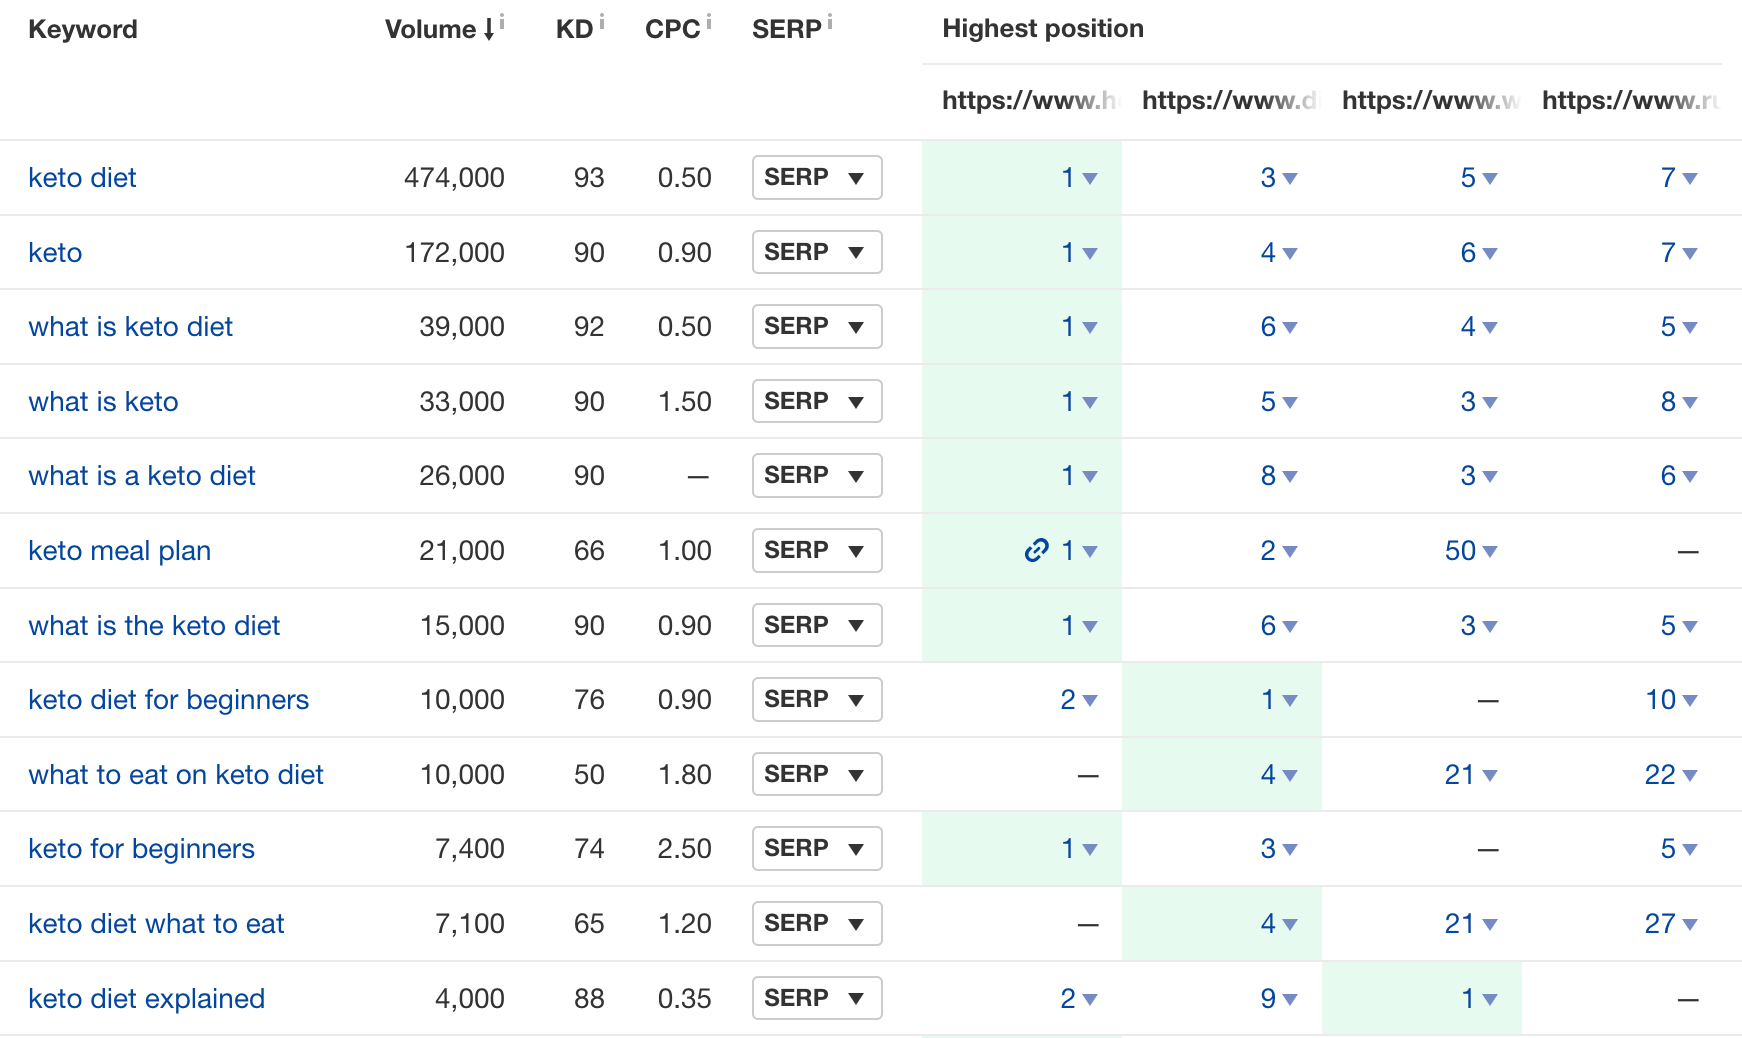
We can see that these pages are ranking for such subtopics:
- What is the keto diet
- What does keto mean
- Keto diet rules
- Is keto diet healthy
- What to eat on keto diet
And more.
If we’re covering the same topic—”keto diet” from a similar angle (“beginner’s guide”)—then they’ll likely make good H2s.
C. Look at People Also Ask boxes
Google anything these days, and you’ll see this:
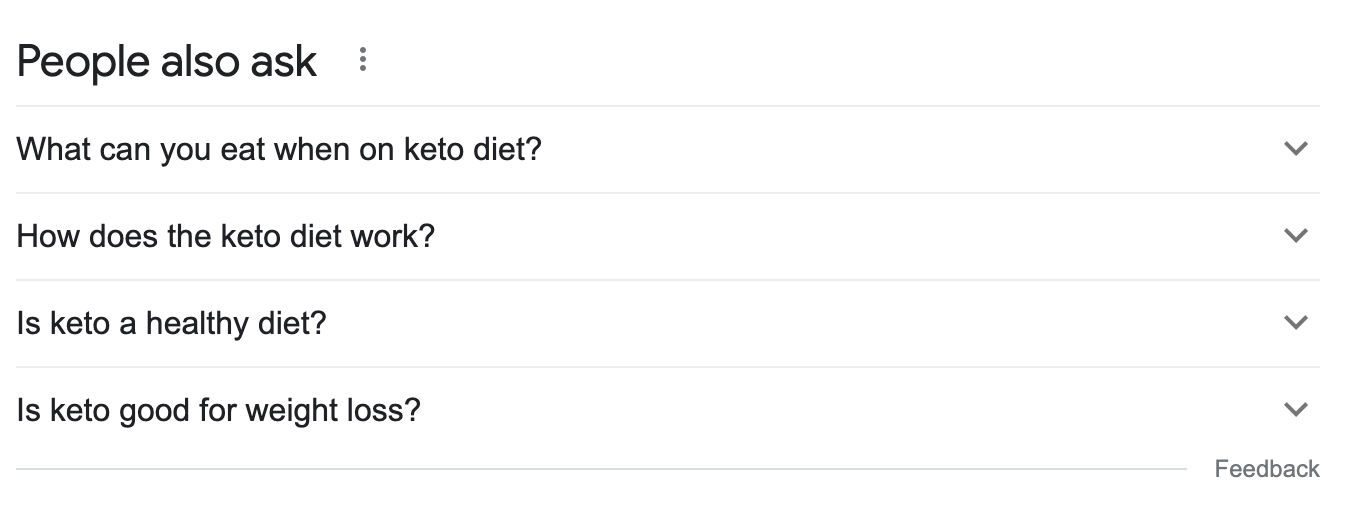
These are known as People Also Ask (PAA) boxes, and they answer questions related to your search query. Since these are likely popular questions, you may want to answer them in your content too.
To gather all of these questions, you can either click on them over and over or use a tool like AlsoAsked.
Alternatively, if you’re simply looking for questions related to your main topic (and are not necessarily PAA), try this method:
- Go to Ahrefs’ Keywords Explorer
- Enter your topic
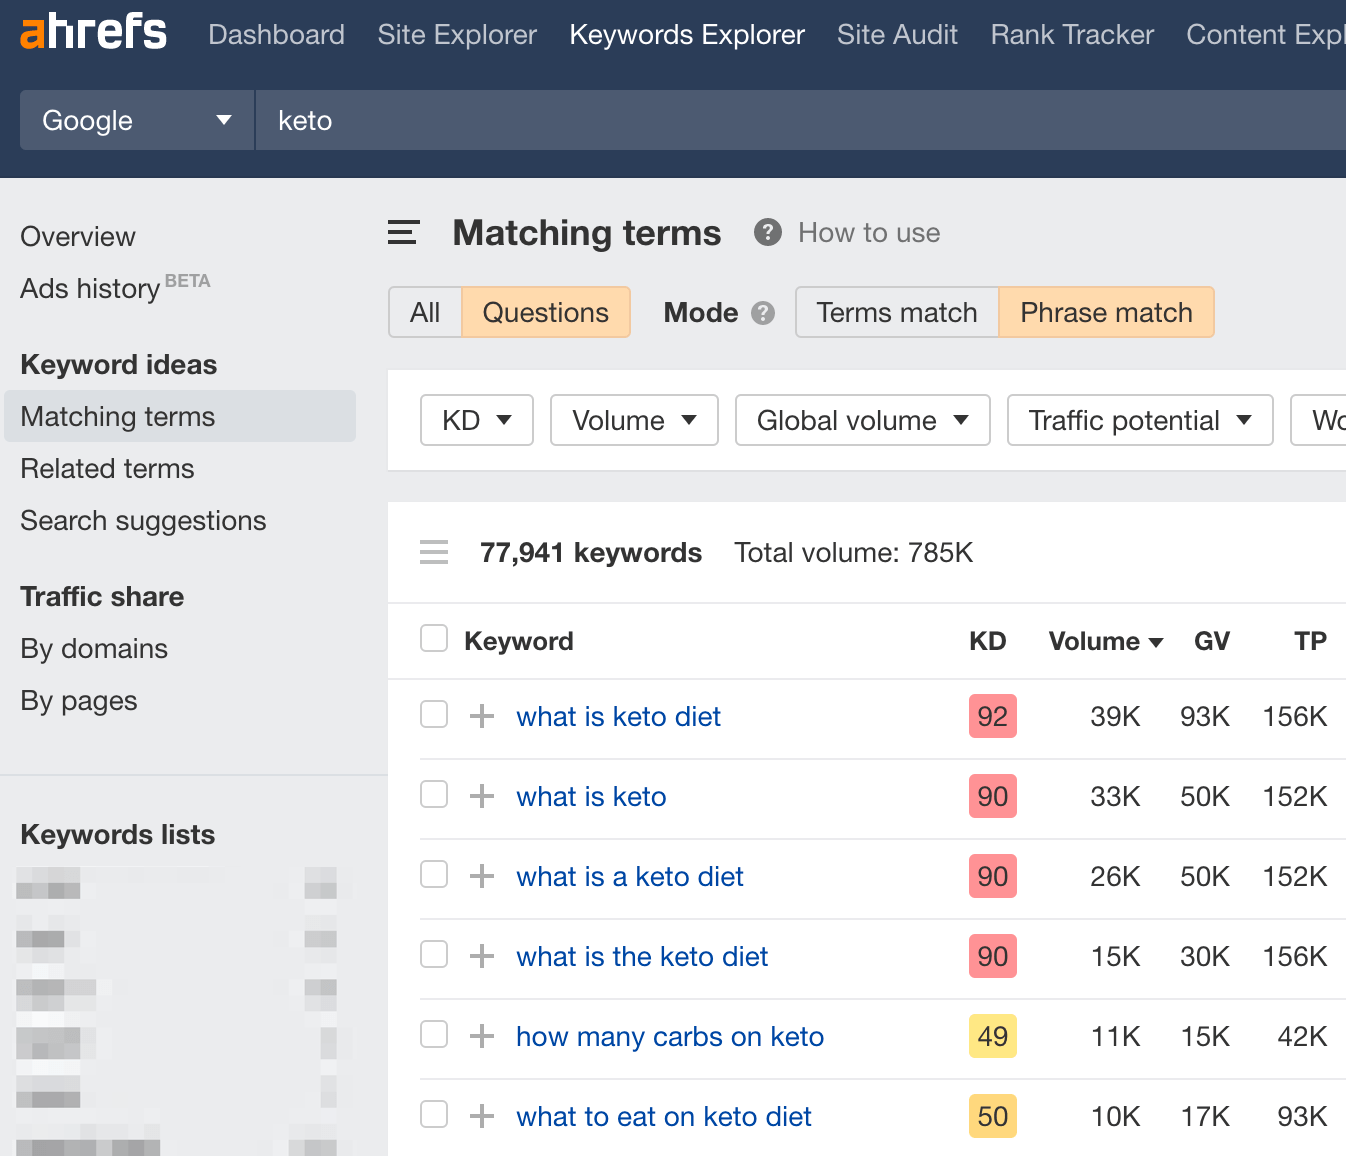
- Go to the Matching terms report
- Switch the tab to Questions
- Click on the hamburger menu beside the XX, XXX keywords
- Switch the tab to Parent topics
- Click on your main topic (e.g., “keto diet”)
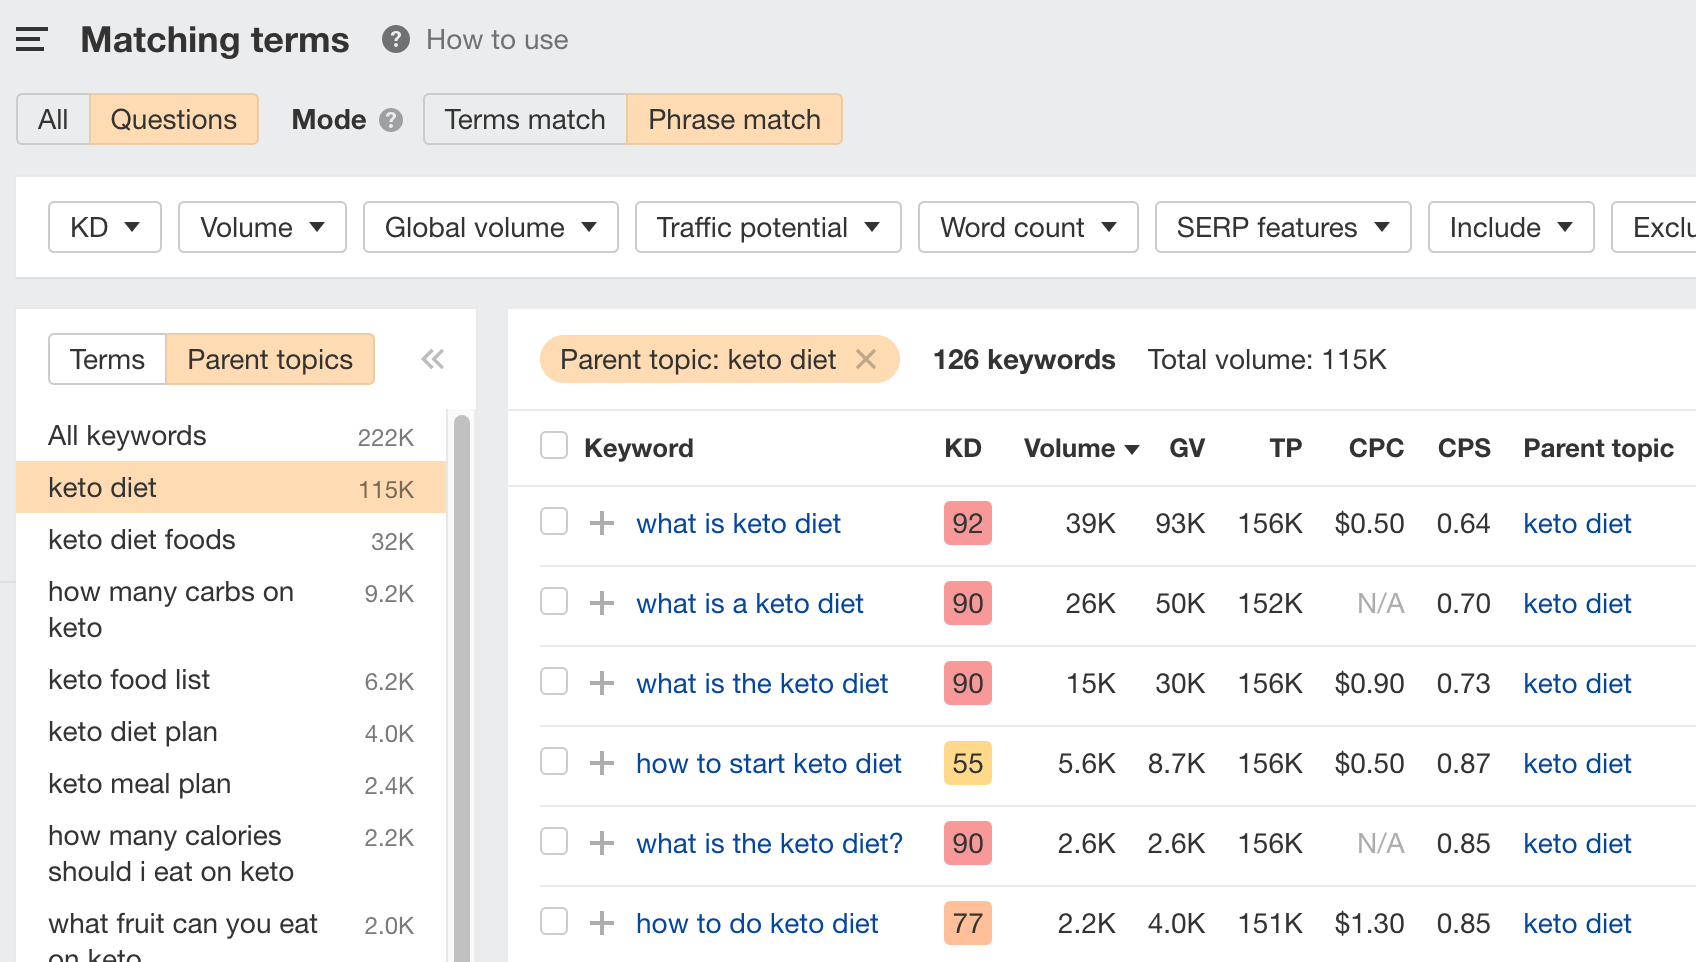
Here, you’ll see all the questions grouped under the same Parent Topic—in this case, “keto diet.”
Look through the report and see if there are any questions worth answering in your article.
You’ll want to flesh out each section so you (and your editor, client, etc.) can understand what you’re trying to say and where you’re coming from.
But don’t make the mistake of writing the full draft here. This is an outline, not the actual post. So just leave ideas that’ll support and substantiate what you’re going to cover.
Here are some examples of bullets you may add:
- Brief explanation of your argument
- Examples of how your particular item/step/tactic/etc., works
- Potential expert quotes (if you’re using them)
- Data you’ll be citing
For example, here’s a recent outline of mine for a post on content pillars:
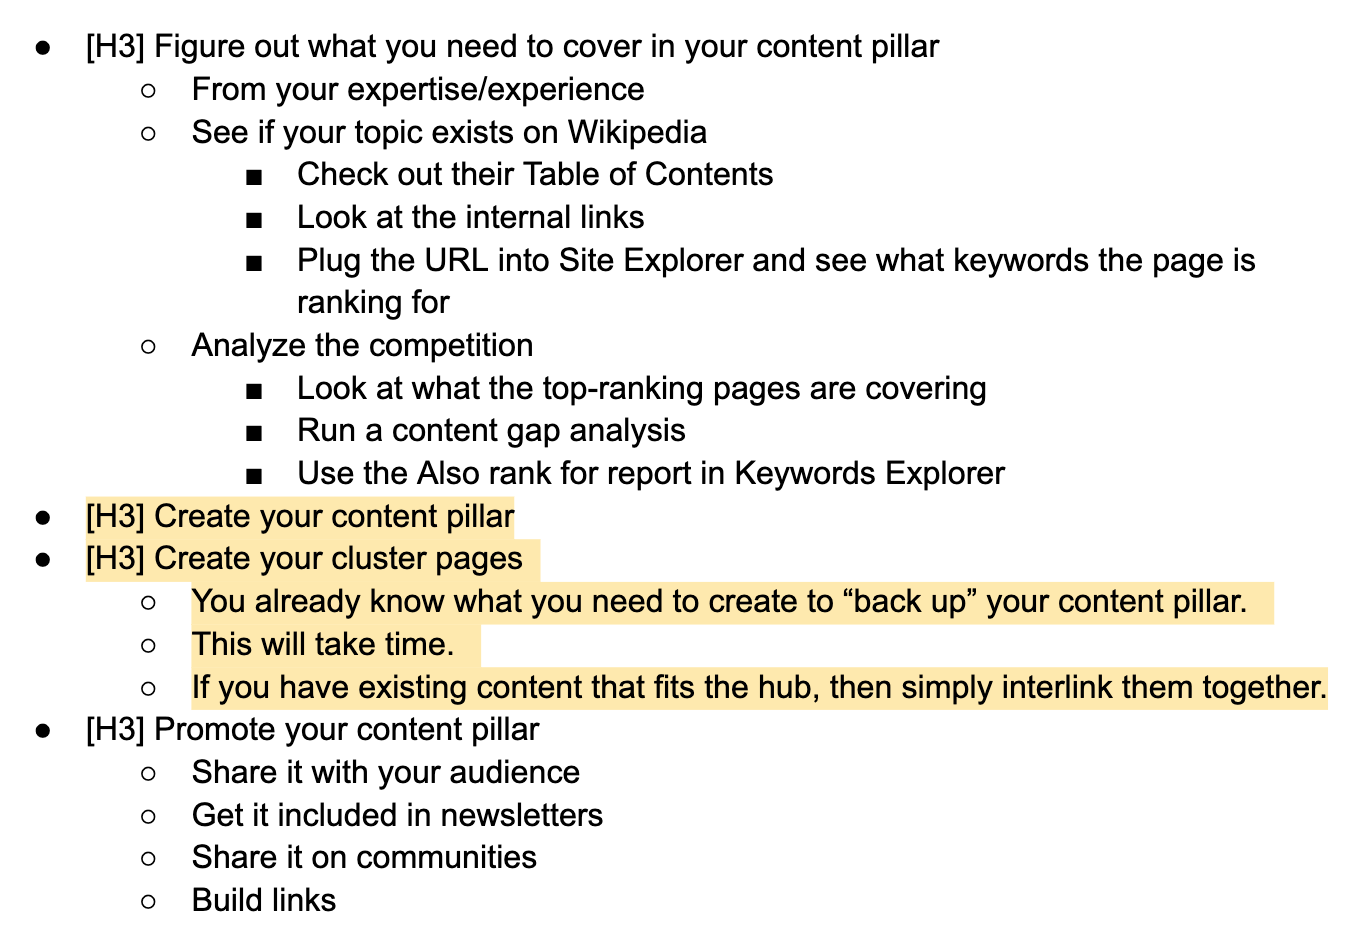
I create bullet points and simply indicate the ideas I’ll share under each subheading. But not all outlines look the same. You can choose to not make them so detailed too.
The world’s your oyster. Do what works for you and whomever you’re working with.
The goal of your intro is to “hook” the reader into finishing your entire article. So it’s a good idea to plan out (at least an idea) what you wish to say here.
Again, don’t fall into the trap of fleshing the entire thing out. Just a couple of bullets will do.
To plan your intro, a simple formula you can follow is the Problem-Agitate-Solve (PAS) formula.
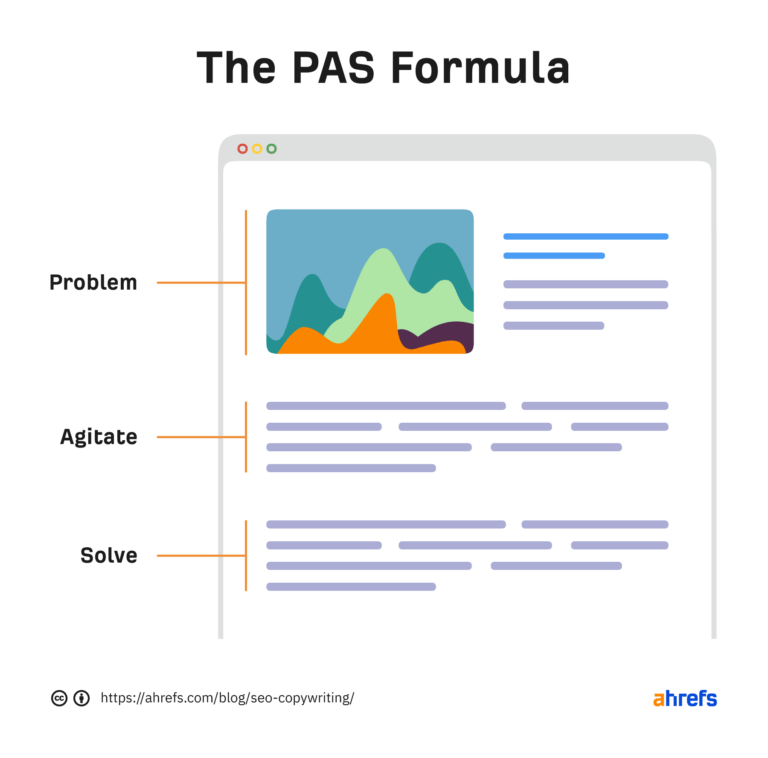
Here’s how it works:
- State the Problem
- Agitate the problem by digging more into the pain (felt by the reader)
- Offer a potential Solution
And here’s what it looks like in real life:
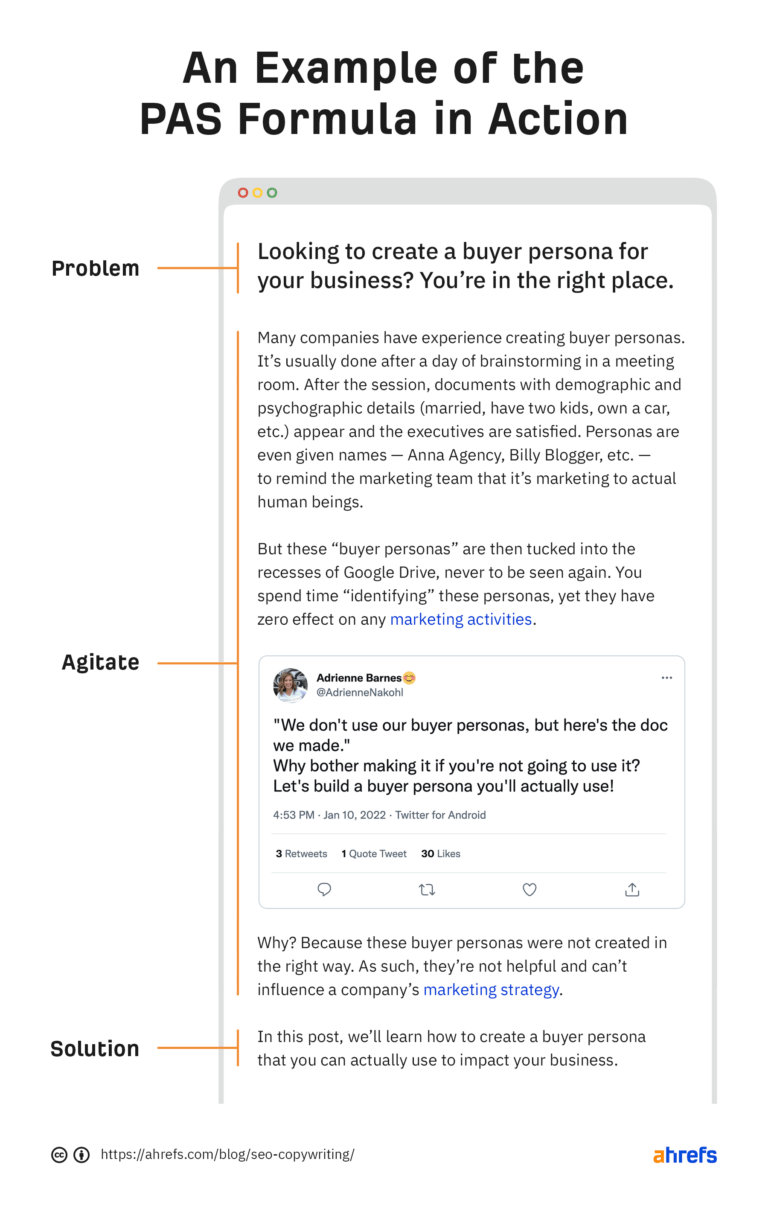
For your conclusion, I recommend planning a one-line takeaway of your entire article, providing links to further resources, or sharing a final consideration for your readers to think about.
Final thoughts
Before you begin drafting, it’s a good idea to send your outline to someone else—a colleague, editor, or friend. They’ll be able to give you feedback and point out flaws, inaccuracies, or points you’ve missed.
We do this all the time. Every in-house writer has to send their outlines to Josh, our head of content, for review.
Once your reviewer has given their feedback, you can look through it and incorporate their ideas into your outline. Then, it’s finally time to draft.
If you need help writing a blog post, check out this step-by-step guide on how to write one.
Any questions or comments? Let me know on Twitter.
Content Copyrights Belong to The Author. All Rights Reserved.
We're A Dallas Digital Marketing Agency That is Experts At Social Media Marketing, Website Design and Emarketing and Promotion.

